
This post is also available in:
![]()
Last year, I often had to print several copies of an object with different settings, such as different fill levels or support material. After printing the objects one after the other in the beginning, I quickly asked myself whether there is another possibility, such as printing several objects with different settings at the same time?
In general, it is possible to print several objects with different print settings at the same time. For this purpose, the corresponding print settings, such as the degree of filling or the number of upper layers, must be defined separately for each object on the print platform.
Both the names of the respective settings and where these settings can be found vary depending on the slicer. In this post, I’ll go over how you can set the settings using Prusa Slicer and Simplify3D.
Multiple objects with different settings in Prusa Slicer
- Load your CAD model into Prusa Slicer.
- Right-click on the model and navigate with the mouse cursor to the ADD SETTINGS entry at the end of the context menu.
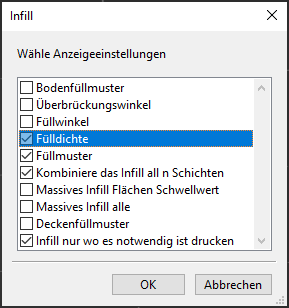
- Select there only the setting that should be adjusted specifically for this object, e.g. Infill.
- In the dialog box that appears, select all the settings for this category that you later want to set individually for each object and confirm the dialog with OK.
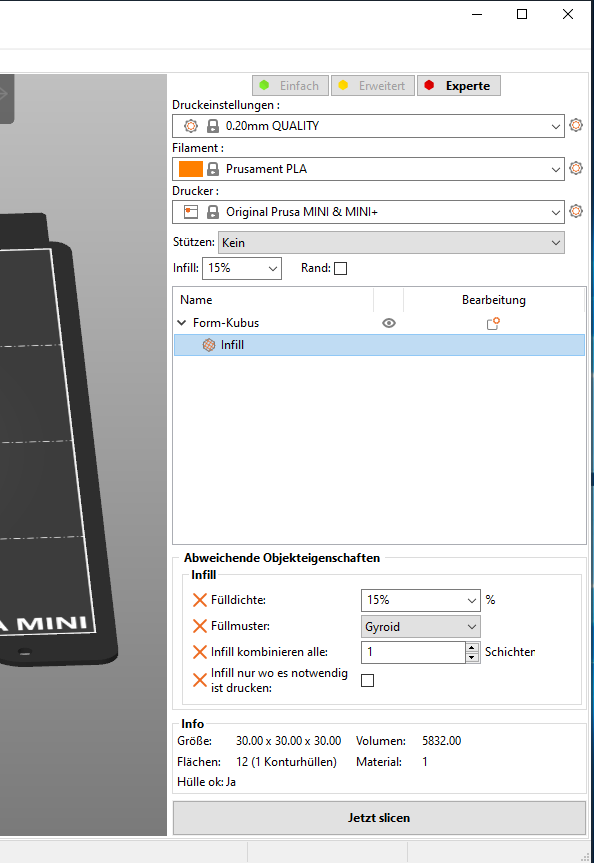
- To be able to change the settings, you have to click on the corresponding entry in the sidebar right below the model. Then the previously selected settings will be displayed below in the sidebar.
- Repeat steps 2-5 for all the settings you want to vary for each object.
- The following subsections describe how to do this, depending on whether you have multiple copies of the same object with the same settings. (a) or several objects with different settings (b) or another object with different settings (c) you want to print.
- If you want to print multiple copies of an object with these settings, select the object on the build platform or in the sidebar and duplicate it by running the
function in the top function group of the 3D view. In the overview in the sidebar, the objects are displayed below the settings belonging to the group.
- If you now want to print several copies of this object with different settings, you have to copy the object with the function
and then paste it again with function
. As you can see in the overview in the sidebar, the object has been copied along with the settings and is only available as a separate object with separate settings independent of the other objects.
- If you want to print a completely different model with different settings, simply add a new model with
to the printing platform and repeat the steps described in point 1-4.
- If you want to print multiple copies of an object with these settings, select the object on the build platform or in the sidebar and duplicate it by running the
- You can now click on the various icons in the sidebar to change the settings of the respective object independently of the settings of the other objects or object groups.
- Click on “Slice now” to prepare the object for printing.
- In the “Sliced Preview” you can look at the models again and make sure that all objects have the settings you have set.
- Now you can either experiment a bit with the settings or export the G-code and start printing.

Multiple objects with different settings in Simplify3D
- Load your CAD models into Simplify3D and place them on the printing platform accordingly
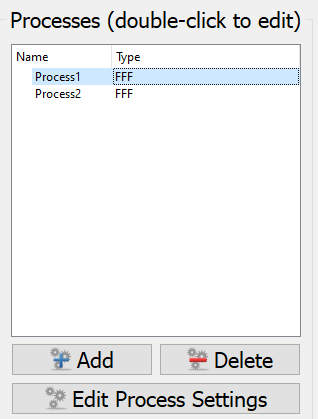
- Now create a separate process in the sidebar on the left for each different variant you want to print.
- Open either by double-clicking or by clicking on the EDIT PROCESS SETTINGS button the settings dialog for the print settings.
- Now configure the corresponding settings in the respective tab, e.g. the fill level or the fill pattern in the Infill tab.
- When you have set all the settings in the dialog, click SELECT MODELS at the bottom left of the dialog.
- In this dialog you can select to which objects the just defined settings should be applied.
- Repeat steps 2 – 6 for all required processes.
- When you have finished configuring your processes, click PREPARE TO PRINT. In the SELECT PROCESSES FOR PRINT dialog, select all processes needed for printing, select the CONTINUOUS PRINTING option and confirm with OK.
- In the print preview you can check whether all settings for the objects of a print job have been applied.
- Now you can copy your objects or send them directly to the printer.


Multiple objects with different settings in Super Slicer
For some time now, Super Slicer, which is based on the source code of Prusa Slicer, has also been available. Apart from the changed color scheme, it not only looks very similar to Prusa Slicer, but also offers the same functions to a large extent, apart from one or two additional features.
The procedure described above in relation to Prusa Slicer (version 2.3.0) is also valid for Super Slicer (version 2.3.57) at the current time. Depending on the direction in which the two slicers develop in the future, there may well be differences here with newer versions.